Network Configuration
If you are running franka-interface and frankapy on the same computer, you can skip this page.
Requirements
- A Control PC computer running Ubuntu 18.04 with a Realtime Kernel. It should also have franka-interface installed with ROS Melodic.
Terminology
Control PC - Realtime Kernel PC connected by Ethernet to the Robot
FrankaPy PC - Computer running FrankaPy
Ethernet
Plug an ethernet cable directly between the Control PC and the FrankaPy PC.
Go into the Ubuntu Network Connections Menu on the Control PC.
Select the Wired connection that corresponds to the Ethernet port that is connected to the FrankaPy PC. Then click the settings gear icon to edit.
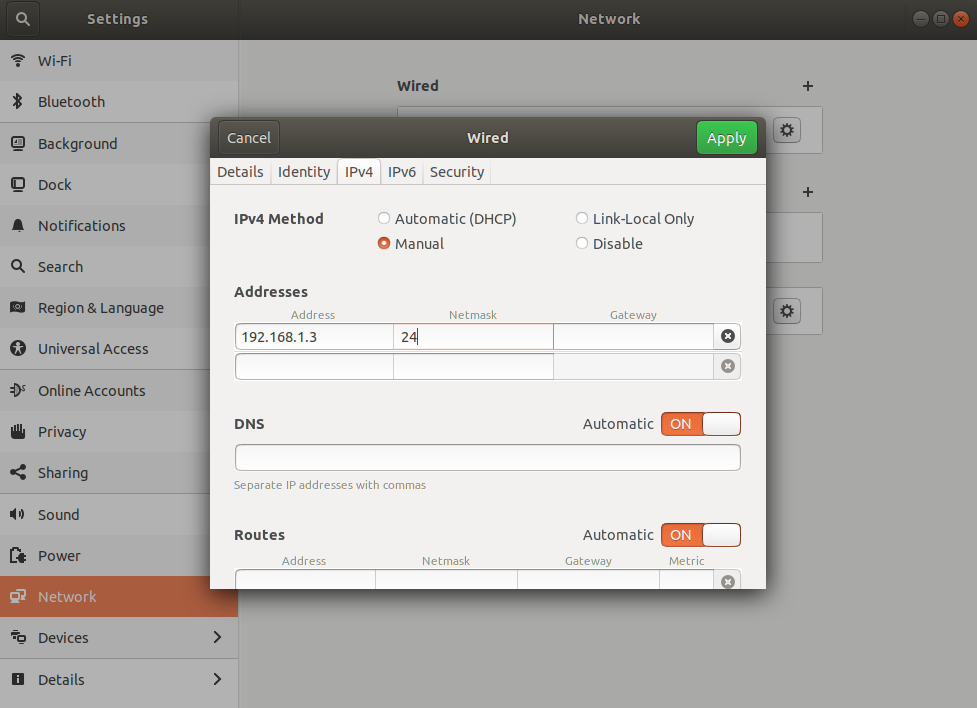
Go to the IPv4 Settings Tab and switch from Automatic (DHCP) to Manual. Add a static ip address like 192.168.1.3 on the Control PC with netmask 24 and then click Apply.
Then do the same on the FrankaPy PC but instead set the static ip address to be 192.168.1.2 with netmask 24.
Wifi
While FrankaPy will work over Wifi, it is not recommended due to additional latency in sending commands between computers.
- If you are only communicating with the Control PC over Wifi, use the command
ifconfigin order to get the Wifi IP address of both the Control PC and FrankaPy PC and note them down.
Editing the /etc/hosts file
Now that you have the IP addresses for both the Control PC and FrankaPy PC, you will need to edit the /etc/hosts files on both computers in order to allow communication between the 2 over ROS.
On the Control PC, run the command:
sudo gedit /etc/hosts
If you are using an Ethernet connection, then add the following above the line
# The following lines are desirable for IPv6 capable hosts:192.168.1.2 [frankapy-pc-name]
- Otherwise substitute
192.168.1.2with the IP address of the FrankaPy PC that you discovered using the commandifconfig.
Afterwards, on the FrankaPy PC, again run the command
sudo gedit /etc/hostsand add the line:192.168.1.3 [control-pc-name]
- Otherwise substitute
192.168.1.3with the IP address of the Control PC that you discovered using the commandifconfig.
Now you should be able to ssh from the FrankaPy PC to the Control PC using the command:
ssh [control-pc-username]@[control-pc-name]
Input password to control-pc.
Setting Up SSH Key to Control PC
Generate a new SSH Key on the FrankaPy PC
Generate a SSH key by executing the following commands or reading these instructions:
ssh-keygen -t rsa -b 4096 -C "your_email@example.com"
[Press enter]
[Press enter]
[Press enter]
eval "$(ssh-agent -s)"
ssh-add ~/.ssh/id_rsa
Upload the public SSH key to the Control PC
In a new terminal on your FrankaPy PC, use your favorite text editor to open your
id_rsa.pubfile:gedit ~/.ssh/id_rsa.pub
Copy the contents in your
id_rsa.pubfile.Next, SSH to the Control PC:
ssh [control-pc-username]@[control-pc-name]
Input password to control-pc.
Use vim to open the authorized_keys file:
vim ~/.ssh/authorized_keys
Press the following buttons to paste your copied public key into the
authorized_keysfile on the Control PC:i ctrl-shift-v <esc> : w q <enter>
Open a new terminal on the FrankaPy PC and try SSHing to the Control PC and it should no longer require a password.
(Optional) Upload your SSH key to Github by following instructions here.